| What
will a forming star look like in HR diagram? |
|
|
|
|
|
|
|
|
|
|
|
|
|
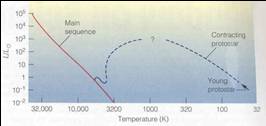
| • | Temperature changes relatively simple |
|||||||||||
| – | Starts out large and relatively cool Must be on red side of diagram |
|||||||||||
| – | It heats up as it contracts Must towards the blue |
|||||||||||
| • | Luminosity more complicated because it depends on
T and R |
|||||||||||
| – | Not much energy to start with Luminosity must start out low |
|||||||||||
| – | Collapse releases grav. energy Luminosity will rise |
|||||||||||
| – | Fusion begins, releases more energy Luminosity at a peak |
|||||||||||
| – | Collapse slows, only have fusion now Luminosity declines |
|||||||||||
| • | Finally stabilizes on the main sequence |
|||||||||||