Overview
Both WIRO-Prime and WIRO-Spec make use of the ST-237 CCD camera as a guider. The ST-237 is manufactured by the Santa Barbara Instrument Group ( SBIG ) and has 657 X 495, 7-mm pixels. In the case of WIRO-Prime the ST-237 is mounted on the 6" refractor on the south side of the telescope truss. When using WIRO-spec the ST-237 is placed on the Guider-Acquisition Module ( GAM), which is mounted at the Cassegrain focus of WIRO and also contains the fiber optic assembly and the comparison lamps. The ST-237 guider is currently operated using Maxim-DL and involves centroiding within a "region of interest". These positions are converted into an error signal which is in turn fed to the telescope TCS via the hand-panel input.
Connecting the ST-237 Guider
Begin by mounting the ST-237 on either the south refractor (WIRO-Prime) or on the Cassegrain GAM (WIRO-Spec). The parallel plug on the end of the camera cable should be plugged into the small Parallel/Ethernet interface box. Make sure that this box is connected to the larger, black SBIG interface box using the short parallel cable. Be sure to check that the white power supply is connected to the interface box and that the Ethernet cable is also plugged in. Next, be sure that the small SBIG relay box is connected to the "telescope" output of the black, SBIG interface box via a short phone cord. Finally, be sure that a grey cord extends from the "telescope" output of the black SBIG interface box to the rear of the rack on the east side of the south pier of the telescope. This cable mimicks the button/relay closures from the telescope hand panel and hence provides the guide signals to the TCS. It is very important to verify that the hand-panel enable switch located on the platform control panel is in the "off" position in order for the guide signals to be sent to the TCS.
ST-237 Guider Interface
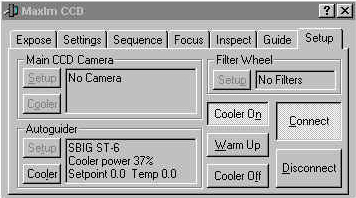
The guide camera consists of an SBIG ST-237 CCD camera. The ST-237 is operated in a "guiding mode" using a commercial software package (Maxim DL). Images are acquired from the ST-237 CCD and centroiding over a selected region, containing a star, is used to provide a guide signal. The guide signal consists of four simple TTL signals representing +- x-y offsets which are then fed into the WIRO control system via the hand-pannel input. The figure at left below shows the setup screen for the guider.
Getting Started:
Once the CCD is connected and turned on return to the control room and:
1) Start the Maxim DL/CCD software on the Guildenstern Windows machine,
2) Establish a link to the ST-237 CCD camera using the "connect" button (if there is a problem check that the IP address is correct),
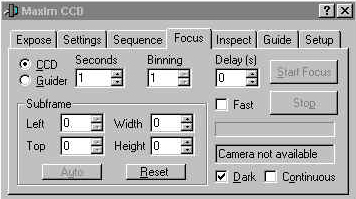
3) Select "focus" (above at right) and enter the exposure time and the subframe dimensions (if desired). Be sure that the "continuous" box is checked and click on "Start Focus" to begin the focus sequence. Take exposures of at least 5-10 sec. in order to avoid seeing variations; if the star is saturated (64,000 cnts) find a fainter star.
4) Switch to the "inspect" mode and monitor the full-width at half maximum (fwhm) and the peak counts while moving the secondary with the buttons on the free-standing electronics rack to your right.
Calibrating the Guider Motions:

1) Use the mouse to select a suitable guide star in the field.
You may have to use the X-Y motions on the GAM interface to "cruise" around
and find a suitable star. Once one is identified, use the mouse to
"click and drag" the centroiding box over a suitable star.
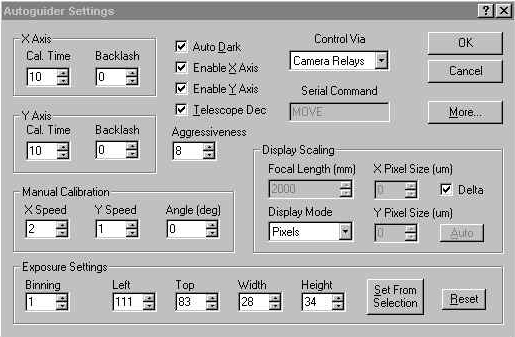
2) Next, select "guide" on the Maxim DL menu screen (see image at left above) and then "settings" in order to calibrate the guider motions. The figure at right above shows the guider settings. Be sure that both the X and Y axes are enabled and that the control will be done through "camera relays". The "calibration time" should be set to at least 10 seconds to produce meaningful results.
3) Click on "set from selection" to select the sub-raster highlighted with the mouse (see above).
4) Refer to the "expose" menu on the main menu and verify that the exposure time is still set to at least 10 sec. Hit "OK" to begin the calibration sequence. The guider will send x and y motions through the hand-panel input for 10 sec., and then take an exposure. The centroid of the stellar image is then measured, and the offsets from the previous exposure computed in order to compute the correct gains.
5) If necessary recenter the star and repeat the process. This process should only need to be done at the begining of the night.
Guiding:
1) Now use the GAM interface to acquire the object. This is done by selecting the GAM mirror to either the "thru" or "pelicle" position.
2) Offset the telescope to the desired object and verify placement on the fiber optic array by taking a sequence of exposures with the ST-237 camera.
3) Next, offset the GAM x-y stage as necessary in order to examine a larger field using the ST-237 and locate a suitable guide star.
4) Once a suitable star is found, select "guide" on the Maxim DL interface and fill in the exposure time and declination of the star.
5) Once a full frame of the field is taken, use the mouse to select and position the centroiding box onto the appropriate star.
6) Hit "start" to begin guiding.
7) Before taking an exposure with the WIRO instrument be sure to verify that the offsets between successive exposures are small and continuous, if there is considerable noise in the star's position (i.e. more than a pixel or two), then quit and try a longer exposure time or a brighter star.
8) Once guiding is satisfactory, begin taking data!